
Setting Up a Dolby Atmos® System with
Nuprime MCX-800AD and Apple® Mac® Mini
Introduction
The Nuprime MCX-800AD is a versatile 8-channel USB Audio DAC and amplifier, ideal for creating an immersive Dolby Atmos system when connected to an Apple Mac Mini. Using one MCX-800AD is sufficient to decode formats with 8 channels or fewer, such as Dolby 5.1.2, while two units are required for more complex setups exceeding 8 channels, such as Dolby 7.1.4. This guide provides step-by-step instructions for both configurations, enabling you to enjoy movies, games, or Apple Music’s spatial audio in Dolby Atmos.
- One MCX-800AD: Handles up to 8 channels (e.g., Dolby 5.1.2).
- Two MCX-800AD units: Supports up to 12 channels (e.g., Dolby 7.1.4).
- With the NuPrime H Series HDMI decoder, one or two MCX-800AD units can be expanded to support Dolby 9.1.6, while also integrating Audio-over-IP (AoIP) for seamless audio distribution
We’ll use macOS’s Audio MIDI Setup to configure the audio output as multi-channel PCM, which the MCX-800AD unit(s) will amplify to your speakers.
This guide assumes you have a basic understanding of connecting audio hardware and navigating macOS. We'll cover hardware setup, audio configuration, application settings, and troubleshooting to ensure a smooth experience.
Prerequisites
Before you begin, ensure you have the following:
- Apple Mac Mini running the latest macOS.
- Nuprime MCX-800AD unit(s):
- One unit for setups with 8 channels or fewer.
- Two units for setups with more than 8 channels.
- USB cables to connect both MCX-800AD unit(s) to the Mac Mini.
- Speakers arranged for your Dolby Atmos configuration:
- For one unit (e.g., 5.1.2): 5 base channels, 1 subwoofer, 2 height channels.
- For two units (e.g., 7.1.4): 7 base channels, 1 subwoofer, 4 height channels.
- Dolby Atmos-compatible content, such as movies, games, or tracks from Apple Music with spatial audio support.
Step 1: Hardware Setup
Option 1: One MCX-800AD (e.g., Dolby 5.1.2)
- Connect to the Mac Mini:
- Use a USB cable to connect the MCX-800AD to a USB port on your Mac Mini. It will be detected as an audio device in macOS.
- Connect Speakers:
- Attach speakers to the MCX-800AD’s output terminals. For a 5.1.2 setup, connect speakers to the MCX-800AD in the order from Channel 1 to 8 in the order: FL, FR, FC, LFE, SL, SR, TFL, TFR
- Base: Front Left (FL), Front Right (FR), Center (FC), Surround Left (SL), Surround Right (SR)
- Subwoofer: Low-frequency effects (LFE)
- Height: Front left height (TFL), front right height (TFR)
- Attach speakers to the MCX-800AD’s output terminals. For a 5.1.2 setup, connect speakers to the MCX-800AD in the order from Channel 1 to 8 in the order: FL, FR, FC, LFE, SL, SR, TFL, TFR
Option 2: Two MCX-800AD Units (e.g., Dolby 7.1.4)
- Connect the MCX-800AD Units to the Mac Mini:
- Set the USB switch next to USB Port (U8) on the back panel to “A” for one unit and “B” for the other.
- Plug one end of a USB cable into each MCX-800AD unit and the other end into separate USB ports on your Mac Mini. Each unit will appear as an individual audio device in macOS.
- Connect speakers:
- Distribute speakers across both units’ output terminals.
- Base: Front Left, Front Right, Center, Surround Left, Surround Right, Surround Back Left, Surround Back Right.
- Subwoofer: Low-frequency effects (LFE).
- Height: Top Front Left, Top Front Right, Top Rear Left, Top Rear Right.
- First unit selected by Audio MIDI has Channel 1 to 8 as FL, FR, FC, LFE, SL, SR, SBL, SBR.
- Second unit selected by Audio MIDI has Channel 1 to 4 as TFL, TFR, TRL, TRR.
- Distribute speakers across both units’ output terminals.
Step 2: Configure Audio Devices in Audio MIDI Setup
macOS uses Audio MIDI Setup to manage audio devices. We'll combine the two MCX-800AD units into a single multi-channel output device to handle Dolby Atmos PCM audio.
Option 1: One MCX-800AD (e.g., Dolby 5.1.2)
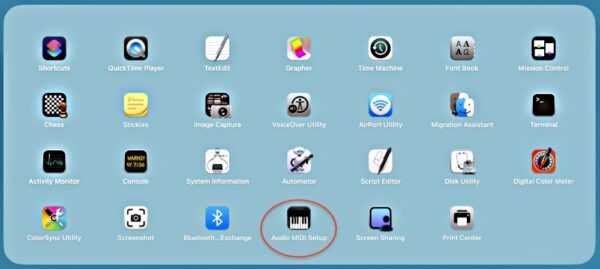
- Open Audio MIDI Setup:
- Go to Applications > Utilities > Audio MIDI Setup.
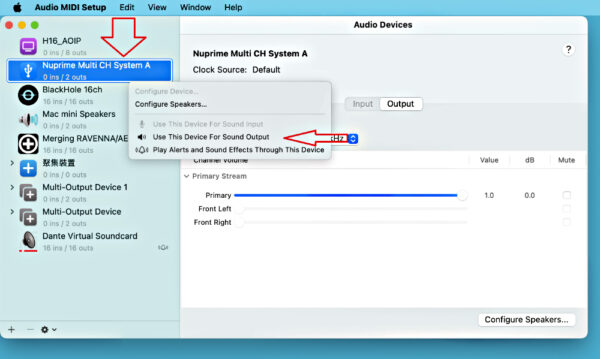
- Locate the Device:
- In the left sidebar, find the MCX-800AD (e.g., "Nuprime MCX-800AD A" if USB Switch is set to A).
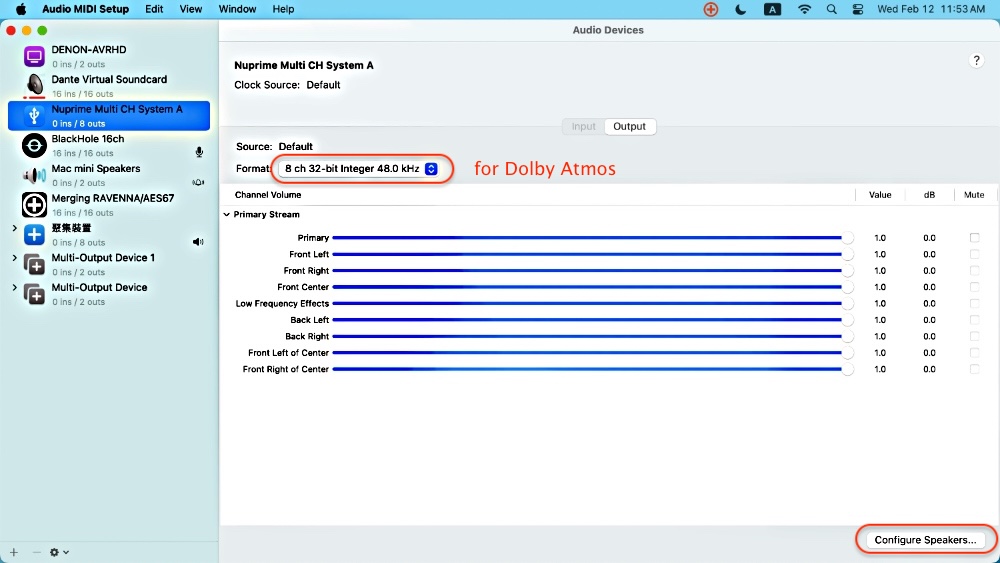
- Set Multi-Channel Output:
- Select the MCX-800AD, then click Configure Speakers.
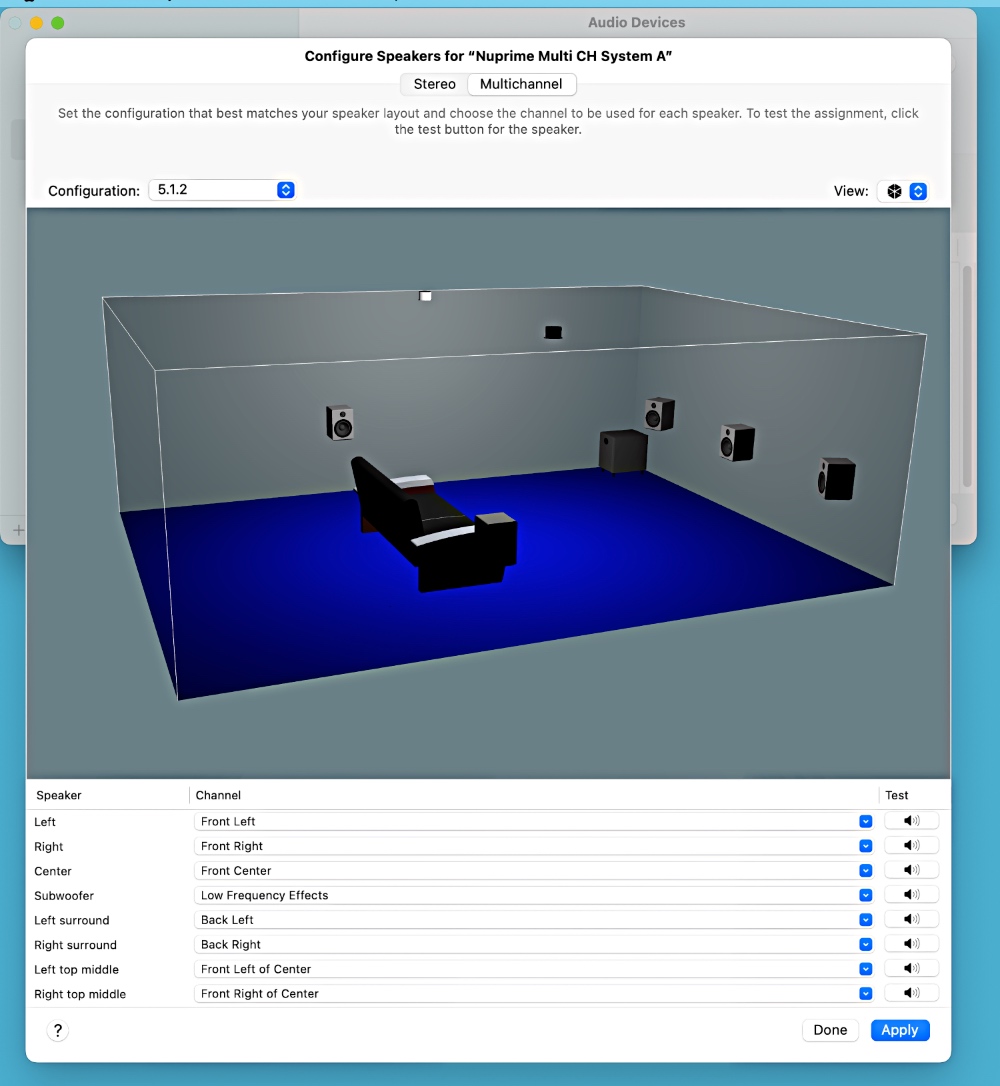
- Choose Multichannel and select 5.1.2 Surround.
- Assign each channel to the corresponding speaker output. Channel 1 to 8 default order for Dolby Atmos: FL, FR, FC, LFE, SL, SR, TFL, TFR. Note that macOS Audio MIDI shows “Back Left” and “Back Right” in 5.1.2 setting and should be mapped to “Surround Left” and “Surround Right”.
- Save Settings:
- Click Apply, then Done.
Option 2: Two MCX-800AD Units (e.g., Dolby 7.1.4)
- Open Audio MIDI Setup:
- Go to Applications > Utilities > Audio MIDI Setup.
- Verify Device Recognition:
- In the left sidebar of the Audio Devices window, look for both MCX-800AD units listed under USB devices (e.g., "Nuprime MCX-800AD A" and "Nuprime MCX-800AD B").
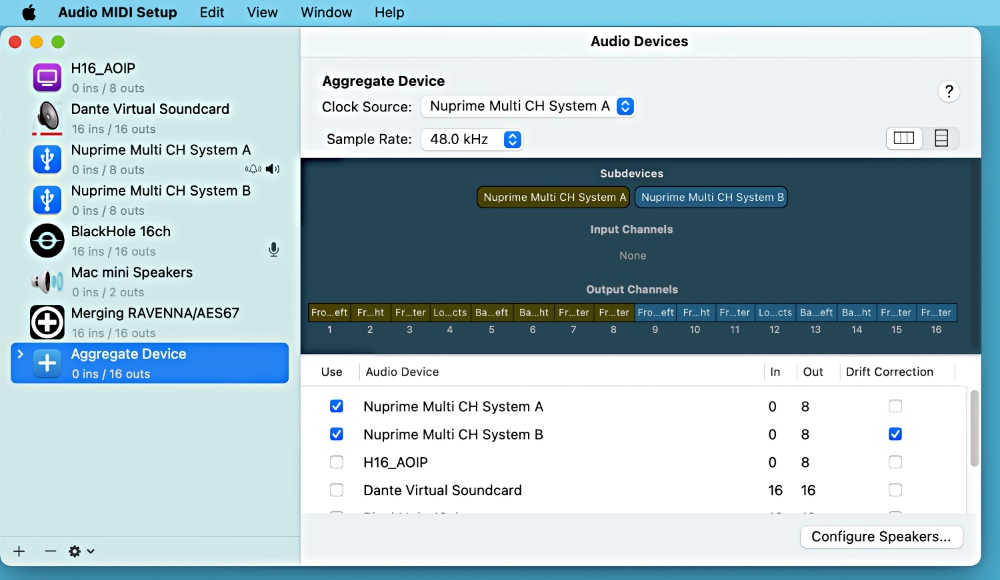
- Create an Aggregate Device:
- Click the + button at the bottom left of the window and select Create Aggregate Device.
- Rename it for clarity (e.g., "MCX-800AD Aggregate") by double-clicking the default name.
- In the right panel, check the boxes next to both MCX-800AD units to include them in the aggregate device.
- Configure Aggregate Device Settings:
- Set the Clock Source to one of the MCX-800AD units (e.g., “Nuprime MCX-800AD A”) to maintain synchronized playback across both units. The Clock Source device should have Drift Correction unchecked, while all other units syncing to it should have Drift Correction enabled.
- Set the Sample Rate to 48 kHz, which is standard for most Dolby Atmos content and supported by the MCX-800AD.
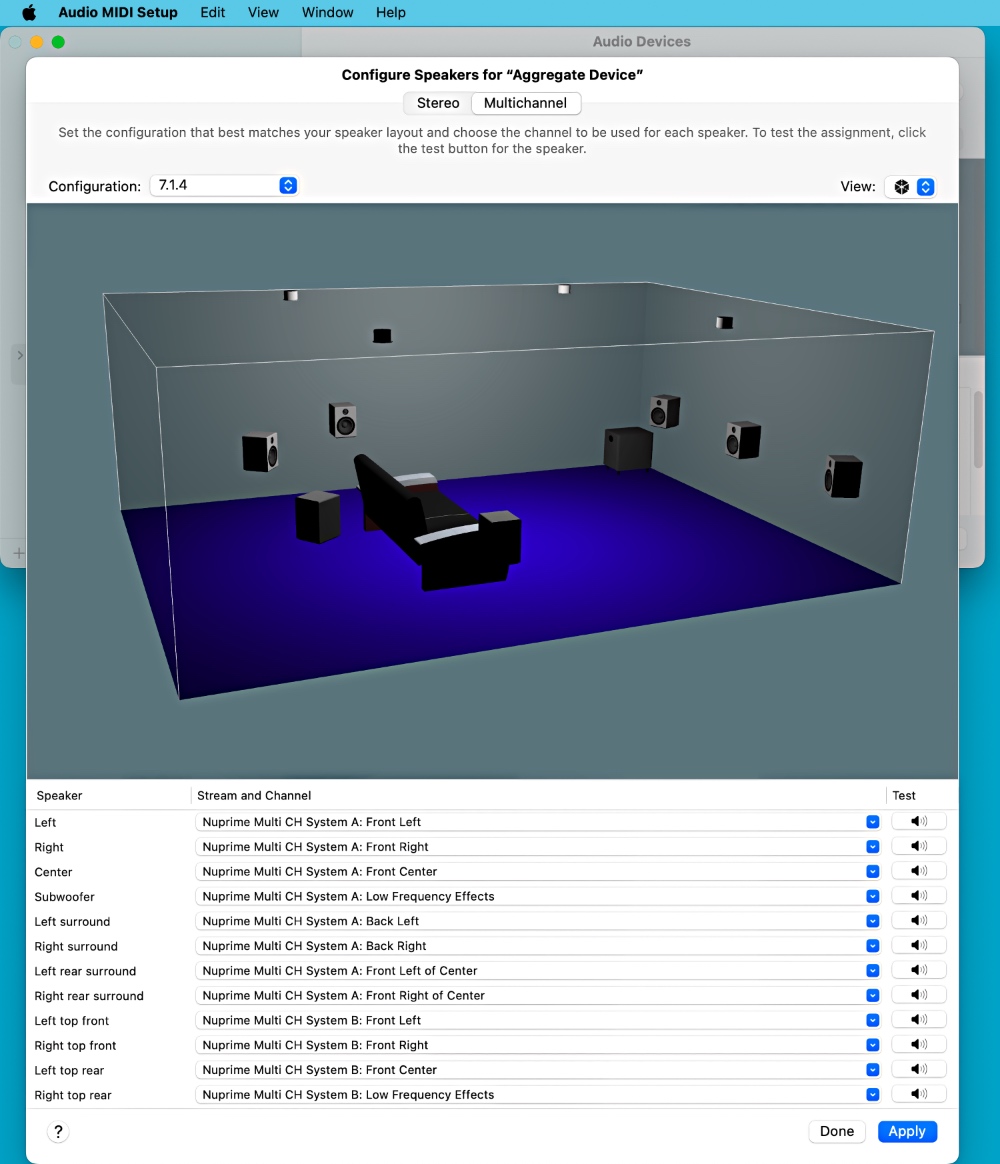
- Set Up Multi-Channel Output:
- Select the aggregate device in the left sidebar.
- Click Configure Speakers at the bottom right.
- Choose Multichannel from the dropdown menu.
- Select your speaker configuration (e.g., 7.1.4 Surround for a typical Dolby Atmos setup).
- Map each channel to the correct speaker output on the MCX-800AD units.
- First unit selected by Audio MIDI has Channel 1 to 8 as FL, FR, FC, LFE, SL, SR, SBL, SBR.
- Second unit selected by Audio MIDI has Channel 1 to 4 as TFL, TFR, TRL, TRR.
- Apply the Settings:
- Click Apply and then Done to save your configuration.
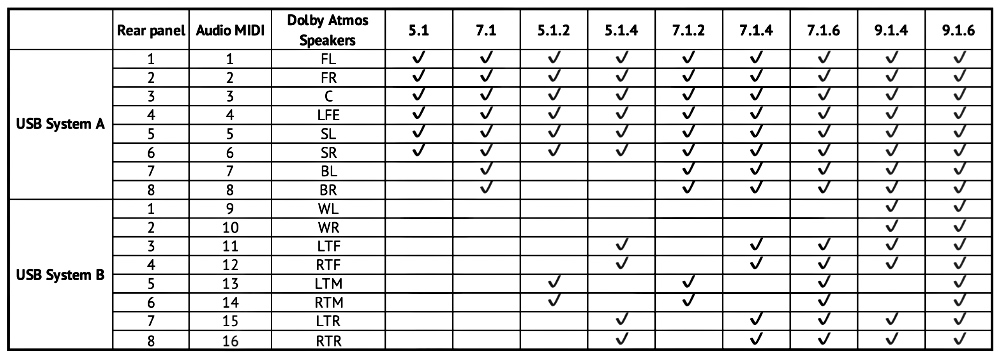
Reference Table for Dolby Atmos formats
The NuPrime Fusion-X platform can decode Dolby Atmos up to 9.1.6. With AoIP, it extends support beyond Dolby Atmos 9.1.6.
Step 3: Configure Applications for Dolby Atmos and Multi-Channel Audio
Dolby Atmos content requires applications that can decode the Atmos metadata and output multi-channel PCM audio to your aggregate device. Here’s how to set up for movies, games, and Apple immersive music.
For Watching Movies
- Choose a Compatible Media Player:
- Streaming services such as Amazon Prime Video, Disney+, Max, Netflix, Paramount+, Vudu, and Games
- Use a player like VLC or Plex that supports multi-channel audio output and Dolby Atmos decoding (if available).
- Configure Audio Settings:
- Open the media player’s preferences or settings menu.
- Set the audio output device to MCX-800AD Aggregate.
- If the player supports Dolby Atmos, enable it and select your speaker configuration (e.g., 7.1.4).
- Load a movie with a Dolby Atmos soundtrack and play it to test the setup.
For Playing Games
- Select a Dolby Atmos-Supported Game:
- Ensure your game supports surround sound or Dolby Atmos (e.g., titles on platforms like Steam or Apple Arcade may offer this).
- Adjust Game Audio Settings:
- Navigate to the game’s audio settings.
- Set the output device to MCX-800AD Aggregate.
- Choose a multi-channel configuration (e.g., 7.1 or Atmos, if available).
- Start the game and verify that sound comes from all speakers, including height channels.
For Apple Immersive Music (Spatial Audio)
- Open Apple Music:
- Launch Apple Music on your Mac Mini.
- Enable Dolby Atmos:
- Go to Music > Preferences > Playback.
- Under Audio Quality, check that Dolby Atmos is set to Always On or Automatic.
- Select MCX-800AD Aggregate as the output device.
- Play Spatial Audio Tracks:
- Find tracks labeled with the Dolby Atmos badge in Apple Music and play them to experience immersive sound through your speaker setup.
Step 4: Testing and Calibration
- Test Audio Output:
- Play a multi-channel test file (available online or within some media players) to ensure each speaker produces sound as expected.
- Adjust Levels and Positioning:
- In Audio MIDI Setup, revisit the Configure Speakers section to fine-tune channel levels or correct any mapping errors.
- Alternatively, adjust settings within your media player, game, or Apple Music if they offer calibration options.
- Optimize Your Setup:
- For the best Dolby Atmos experience, ensure height speakers are positioned above the listening area. Consider room correction software or manual calibration for balanced sound.
Notes and Troubleshooting
- USB Bandwidth Issues:
- If you hear audio dropouts, the USB ports may be overloaded. Try connecting the MCX-800AD units to separate USB controllers (e.g., different sides of the Mac Mini).
- Synchronization Problems:
- If sound lags between speakers, double-check the Clock Source in the aggregate device settings. Ensure both units are locked to the same clock.
- Application Limitations:
- Some apps may not fully support aggregate devices or multi-channel PCM output. Test alternative players or games if you encounter issues. For movies, ensure the audio track is Atmos-encoded and the player can decode it.
- Dolby Atmos Decoding:
- macOS decodes Dolby Atmos internally and outputs multi-channel PCM via USB, which the MCX-800AD then amplifies. Ensure your content and applications are Atmos-compatible for the full effect.
Conclusion
With one MCX-800AD, you can decode up to 8 channels (e.g., Dolby 5.1.2), while two units expand your setup to 12 channels (e.g., Dolby 7.1.4). This guide equips you to configure either option with your Mac Mini, delivering an immersive Dolby Atmos experience tailored to your needs. Enjoy your audio adventure!